| [ << ] | [ >> ] | [Top] | [Contents] | [Index] | [ ? ] |
To start up the Form Designer simply type fdesign without any arguments. (If nothing happens, check whether the package has been installed correctly.) A black window (the main window) will appear on the screen. This is the window in which you can create your forms. Next the control panel appears on the screen. No form is shown yet.
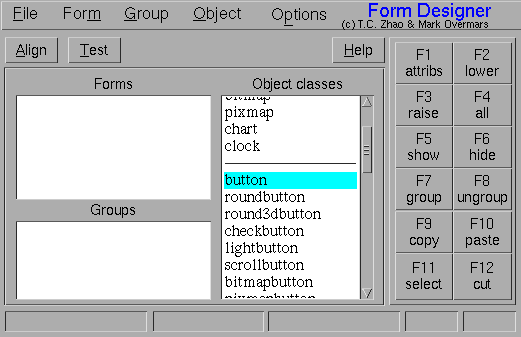
The control panel consists of five parts. The first part is the menu bar, consisting of several groups of menus from which you can make selections or give commands to the program.
Directly below the menu you have a row of buttons for alignment, testing and getting help, see below.
Then there's a panel with three browsers. At the left there is a list of all existing forms. When the program is started without an already existing file as an argument the list is empty, indicating that there are no forms yet. There's no upper limit to the number of forms that can be created but you can only work on exactly one form at a time. Use this list to switch between the different forms. Below the forms list is another list showing all groups in the form you're currently working on. It will be empty for a new form because there are no groups yet. Ignore this at the moment as we will come back to groups and their uses later.
Just right of those two lists you find a list of all the different classes of objects that can be placed into the form. Use the mouse to select the class of a new object you want to add to the form.
On the right side beside the panel with the browsers you find a number of buttons to give commands to the program. Each of these buttons is bound to a function key. You can either press the buttons with the mouse or press the corresponding function keys on the keyboard (while the keyboard focus is on the window with the form). The functions of these keys will be described below.
To create a new form select the "New Form" entry in the "Form" menu. A
little popup box will appear, prompting you for the name of the new
form. This is the name under which the program you're going to write
will know the form. Thus you will have to provide a name which must be
a legal C variable name. Type in the name and press <Ok>. Now
the color of the window for showing the form you're working on changes
to that of the default background color of forms. (Actually, each new
form gets created with a box already covering its entire area, what
you see is the color of this box. You can change most properties of
this box using the methods described below. Just its size is fixed to
the size of the form, which can be simply changed by resizing the
window.) Note that the form's name is added to the list of forms in
the control panel.
To add an object to the form select its class in the control panel by selecting an item the list of object classes. Then move the mouse into the window with the form you are working on and drag the mouse while pressing the left mouse button. By keeping the mouse button pressed you create a box that has the size of the object to be created. Release the button and the object will appear. Note that a red outline appears around the new object. This indicates that the object is selected. In this way you can put all kinds of objects on the form.
Object already created can be modified in several ways. You can move them around, change their sizes or their attributes. To this end first select the object by left-clicking on it. But this only works if there isn't an obkect class selected in the object class browser in the control panel. To get rid of such a selection either click on the selected entry in this browser or by right-click somewhere in the window with the new form. When the object is selected a red outline appears around it. You now will be able to drag the object around with the mouse. By grabbing the object at one of the four red corners you can change its size. It is also possible to select multiple objects and move or scale them simultaneously. See below for details.
To change the object's attributes, e.g., its label, simply
double-click on it with the left mouse button. Or single-click on it
and then press the function key <F1> (or click on the button
labeled "F1 attribs" in the control panel or select "Object
attributes" from the "Object" menu). A new form appears in which you
can change all the different attributes. Their meanings should be
clear (if you have read the documentation on the Forms Library).
Change the attributes you want to change and finally press the button
labeled "Accept". To reset all attributes to their original values
press "Restore" (or "Cancel" if you also want to close the window for
modifying the attributes). See below for more information about
changing attributes.
In this way you can create the forms you want to have. Note that you
can have more than one form. Just add another form in the way
described above and use the list of forms to switch between them.
After you have created all your forms select "Save" or "Save As"from
the "File" menu to save them to disk. It will ask you for a file name
using the file selector. In this file selector you can walk through
the directory tree to locate the place where you want to save the
file. Next, you can type in the name of the file (or point to it when
you want to overwrite an existing file). The name should end with
.fd. So for example, choose `ttt.fd'. The program now
creates three files: `ttt.c', `ttt.h' and `ttt.fd'.
`ttt.c' contains a readable piece of C code that creates the
forms you designed. The file `ttt.h' contains the corresponding
header file for inclusion in your application program. The file
`ttt.fd' contains a description of the forms in such a way that
the Form Designer can read it back in later. The application program
now simply has to call the routines with names like
create_form_xxx() (replace xxx with the names you gave
to the forms) to create the different forms you designed.
These are the basic ideas behind the Form Designer. In the following chapters we describe the program in more detail.
| [ << ] | [ >> ] | [Top] | [Contents] | [Index] | [ ? ] |
This document was generated by Jens Thoms Toerring on January 5, 2014 using texi2html 1.82.